Introduction
Overview
For users looking to self-host, this documentation helps you set up your system: determine your data storage and backup, your web server, apply SSL, and your domain. You can then point your apps to the server and get moving.
These are the applications we use, and while they may require technical knowledge, they usually only take 1 hour or so if you have the background to do this setup, and know how to configure the settings.
Server Configuration
Configuring your system properly may take some tuning and some work to ensure you have all your updates, and settings done properly.
Router
If you are hosting from your business, you will need to use port forwarding and forward port 443 to your server (if you use Certify the Web with lets-encrypt) If you are going to use a custom solution, you will need to arrange for your SSL to use another port.
SQL Server
From the time of this document, the 2019 SQL Server is the oldest installation of SQL Server we support. You will need to install SQL Server on the server.
You may set up your login for SQL Server, however, for the basic setup, you can use SQL Server Authentication. You can use a username and password of your choosing. You may name the database that works for you, the default should be PointlessPOS. This will help us identify if any kind of support is required.
Install Database on SQL Server
Install SQL Server Database. You can download the database from pointlesspos.com/download/datatabase.zip
Domain
If you are self-hosting from onsite (not on the cloud) and are looking for a domain server, you can use http://freeddns.noip.com/ to create a domain where you can point your IIS Server to the domain. For example, we provide our demo's using https://ccsposdemo.ddns.net/api these are routed through the noip.com sites.
You can also register domains with domains.google.com or registrars like GoDaddy.
IIS
To automate the installation of Windows features required to run a WebAPI using IIS, you can use PowerShell scripting. Here's a step-by-step guide on how to accomplish this on Windows 10:
Step 1: Open PowerShell as an administrator
- Press the Windows key, type "PowerShell," right-click on "Windows PowerShell," and select "Run as administrator."
Step 2: Check the current status of the required Windows features
- Run the following command to check if the required features are already installed:arduinoCopy code
Get-WindowsFeature -Name Web-Server,Web-Asp-Net45
Step 3: Install the required Windows features
- Use the
**Install-WindowsFeature**cmdlet to install the required features. In this case, we need to install the Web Server (IIS) and ASP.NET 4.5 features. Run the following command:arduinoCopy codeInstall-WindowsFeature -Name Web-Server,Web-Asp-Net45
Step 4: Verify the installation
- After the installation completes, you can check the status of the features again to confirm the successful installation. Run the command:arduinoCopy code
Get-WindowsFeature -Name Web-Server,Web-Asp-Net45
If you are hosting locally, use IIS, connect it to your Domain, and apply SSL. Installation instructions for your computer is beyond the scope of this document, however, it's a very popular application and is very easy to do. You may need to enable additional features, here are the ones you will have to enable from the Windows configuration.
Manual Adjustments can be Made using Windows System Features
From Windows - Programs Install/Uninstall you may set up these features.
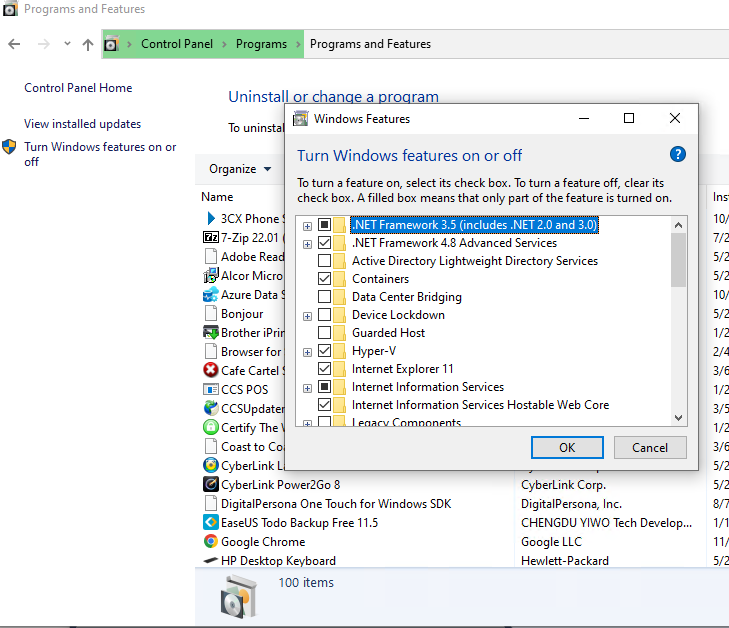
Turn on off features
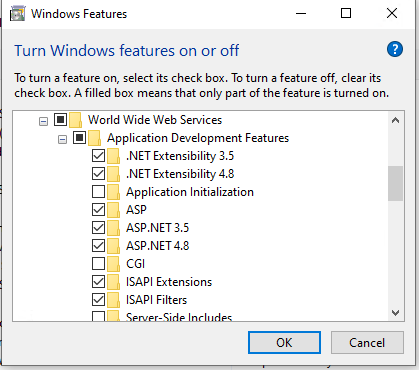
Windows Features
Install API on ISS
You may download the webapi from pointlesspos.com/download/webapi.zip
You will need to configure the web.config file.
It's recommended you apply to keep alive always to ensure your site is always responsive.
https://www.nickedeye.com/iis-keep-website-alive-always-running/
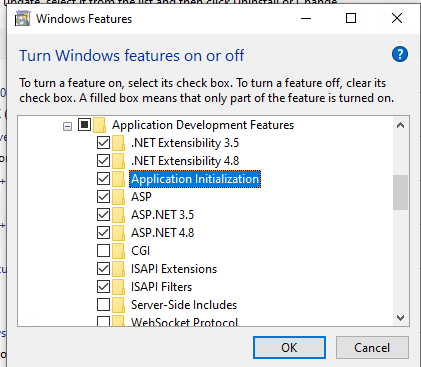
Initialization
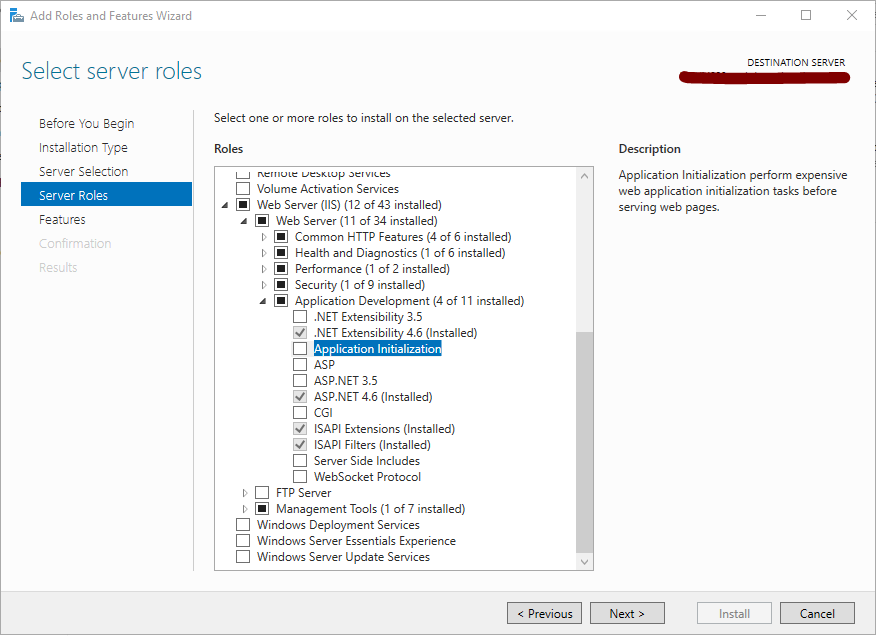
Application Initialization Feature
Having this feature installed, gives you the ability to make IIS automatically probe your website or web application (like a visitor hitting your page) to keep it active and warm. It can also let you serve a static page (splash page) when your website is starting up.
The Application Initialization Feature can be installed as part of IIS features.
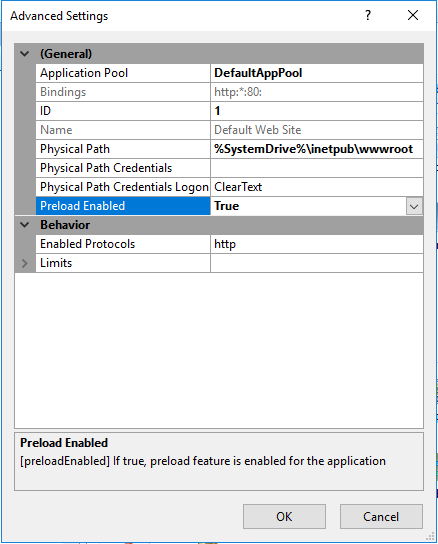
Website or Application Preload Enabled
With Preload Enabled option set to true, IIS will simulate a request to ping your website or application as soon as a worker process (w3wp.exe) for your website or application is started. This will warm up your website or application. This dummy request hit will however not be logged in the IIS Log.
Application Pool Start Mode: AlwaysRunning
Making Start Mode option AlwaysRunning will make IIS spawn a new worker process (w3wp.exe) for your website or application whenever IIS is started. Or when your application pool idle time-out and shut down occurs. Or when your application pool is recycled.
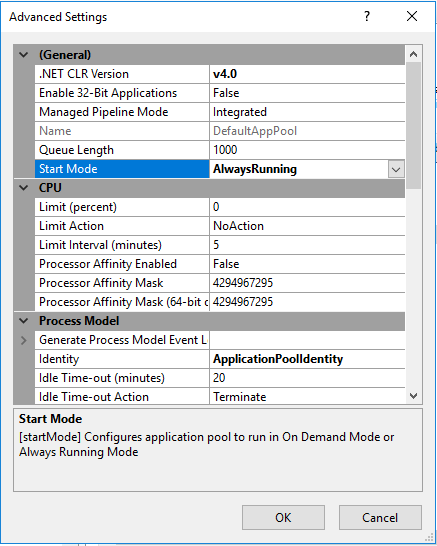
With these main ingredients mentioned in place, your website is set to keep running and warm even without real visitors hitting.
Other considerations to keep your website or application run properly while always running
- Application Pool Idle Time-out
- Application Pool Recycling
While achieving a constantly warm and running website or application, it does not mean that there is nothing to worry. These two options, the Idle Time-out and Recycling may cause you problems if you do not understand how it works.
Application Pool Idle Time-out

In consideration, you can set the Idle Time-out to 0 to disable time-out. This may sound like a logical idea to not end your application pool process since you want it always running. But if your website or application has memory leak issues, you will be in for a surprise when your memory max out due to this.
Application Pool Recycling

iis-website-application-pool-recycling-settings
In consideration, you can disable all recycling options here. This may also sound like you have finally found a total solution to a completely uninterruptible website or application. But memory leak is also a beast here. If your website or application memory is not well programmed or managed.
Hence for memory leak control, it might actually be a good idea to use these features to regularly recycle the application pool to release memory resources. However again, your codes must properly anticipate and handle these recycling interruptions. To reinitialize upon start up or save state during shutdown at recycling time.
SSL
SSL is required to run Pointless. If you are using a self-hosted server, you can use Certify the web to apply a let's encrypt SSL to your site.
Certify The Web does the work of configuration and helping attach the SSL to your website. So make sure you configure the IIS Server before you do the SSL. If you do not have port 80 allowed, you can follow this guide: Port 80
Once you setup your SSL you should be able to open your API from your Server:
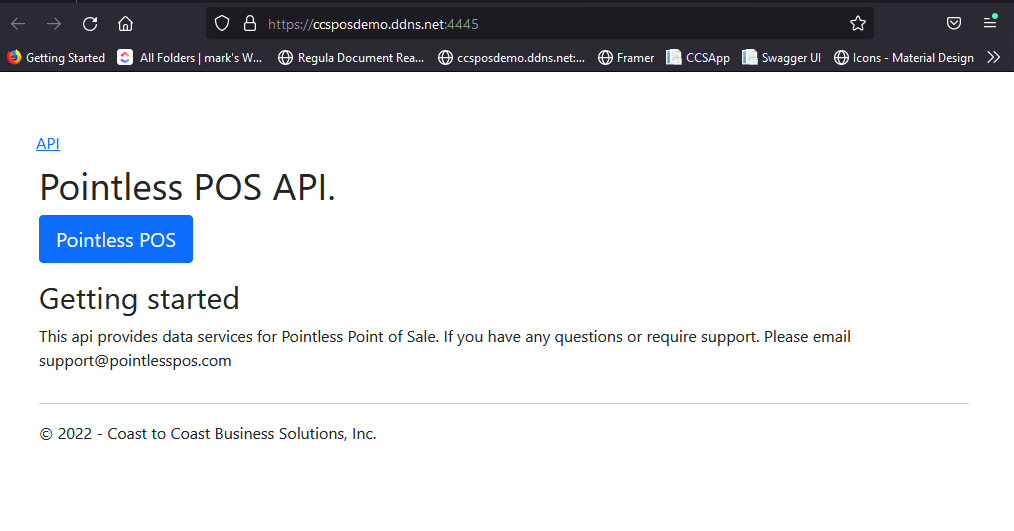
API Setup
API Configuration
Your API has a file located in it, web.config. You will need to modify the file to match your variables. You will need to set up both the connection information and the AppSettings.
Connection information :
The features you will need to change, are the server name, and the database name in the connection info.
Variables
The following variables will need to be changed to fit your system. This can range from Email, to reset passwords, to credit card solutions. These features aren't reviewed here, because each one has its own section for configuration, and you will not use all features, since some are exclusive to the country, region, and business type.
This is a sample set of the settings that will need to be configured in the web.config file. You will need to replace these values with ones you acquire. These are values that are secret and will not be exposed through the API.
<appSettings>
<add key="FromName" value="Pointless POS" />
<add key="FromEmail" value="" />
<add key="FromPassword" value="" />
<add key="Host" value="smtp.zoho.com" />
<add key="Port" value="587" />
<add key="initialPassword" value="!" />
<add key="initializeDatabase" value="x" />
<add key="demoAccount" value="" />
<add key="pointlessRegistrationID" value="" />
<add key="pointlessRegistrationKey" value="" />
<add key="demoUser" value="employee" />
<add key="PointlessURL" value="pointlesspos.web.app" />
<add key="CompanyName" value="Coast to Coast" />
<add key="BusinessPhone" value="866-973-8099" />
<add key="TwilioAccountID" value="" />
<add key="Twilioauthtoken" value="" />
<add key="TwilioPhone" value="+" />
<add key="AWSKey" value="" />
<add key="AWSSecret" value="+sxsvBNuqBRB7LTW2MO" />
<add key="AWSRegion" value="" />
<add key="AWSBucket" value="" />
<add key="AWSBucketContacts" value="" />
<add key="AWSKeyTextract" value="" />
<add key="AWSSecretTextract" value="" />
<add key="CorsURLS" value="*" />
<add key="GenerateEmployees" value="Enabled" />
</appSettings>